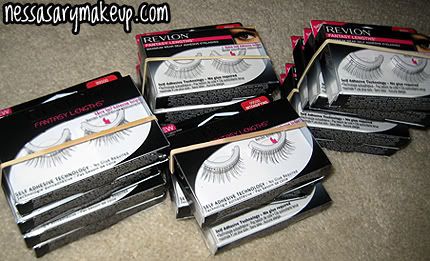
I recently had the opportunity to try some Revlon False Eyelashes, and they are pretty natural looking! I love how they don't need ANY glue whatsoever, so if you are a makeup artist on the go, or going away for the weekend, these make great additions to the makeup bag because you don't need to fumble for the glue.
Product: 4 out of 5
Packaging: 5 out of 5
Quality: 5 out of 5
Overall: 4 out of 5
Where to buy: Pretty much anywhere like drugstores, Target, Wal-Mart, etc.
Price: Ranges depending on store, but starts around $5+
Would I buy again: Yes
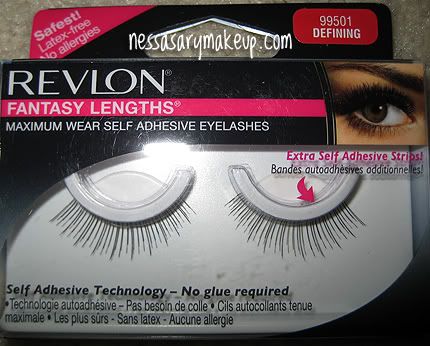
They describe them as: REVLON Fantasy Lengths Maximum Wear eyelashes are a revolutionary way to go from Plain Jane to Naturally Fantastic instantly. Without messy glue to fumble with - you can have perfect lashes that stay where you want them to - even in water!
My 2 cents: I haven't tried them in water, like swimming or taking a shower so I can't say whether they stay in those conditions, lol, but they do stay on pretty well considering there's just a glue adhesive but not actual glue (it's like comparing what stays on better, acrylic nails or sticker press-on nails). But these lashes don't fall off like I thought they would. I actually wore a pair (99501) to the Makeup Show in LA a few weekends ago, and they stayed on for a pretty long time.
The band itself is all black, not clear, so you don't have to worry too much about applying eyeliner if you are in a hurry to 'hide' the band. They don't feel any different (as in uncomfortable) in comparison to regular false eyelashes and each pair of falsies also comes with an EXTRA STRIP of adhesive so that you can re-use them (how awesome is that?!) AND it comes with a tiny plastic square looking thing that I forgot to take a picture of, but it basically is used to help you apply your false lash. You pretty much apply them the same way you apply regular falsies, but without the glue.
To apply the extra band, they have detailed instructions that come with each pair, basically just holding the lash next to the extra band, pressing so that it adheres to the lash, and voila, a brand new pair!
PROS:
- No glue is required
- Stays on well and lasts long (at least for me)
- Easy to find and it's affordable
- Very natural looking lashes, not heavy at all
- Comes with an extra adhesive strip so that you can re-use your lashes
CONS:
- They don't have a lot of variety as of yet in terms of the different styles of lashes like Ardell where they have different series of their lashes and various #'s for each pair(runway, glam, etc.)
Overall: Like I mentioned earlier, for those of you who are on the go, hate glue, or are challenged when it comes to applying falsies; then you might want to give these a try because they are pretty easy to use and easy to find. The only con is that they don't have much selection when it comes to the style of falsies you are looking for, but the ones they DO have are natural looking and soft.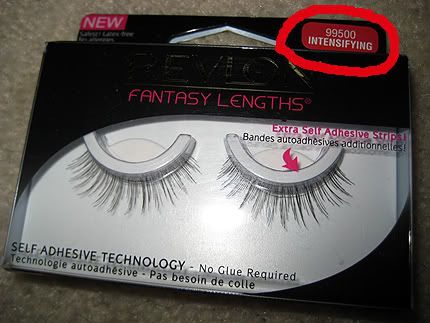
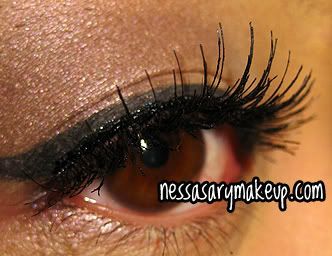
I didn't really go through and blend my lashes with these, but just so you can get an idea of how pretty and natural they look...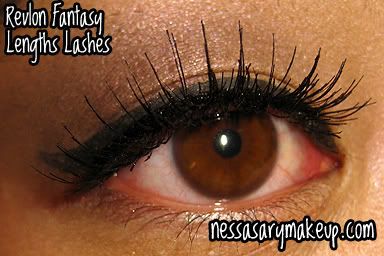
Friday, March 27, 2009
Revlon Fantasy Lengths Eyelashes
Labels: False Eyelashes, Product ReviewsThursday, December 11, 2008
Recommendation: False Eyelash Adhesives
Labels: False EyelashesI had a few questions regarding false eyelash adhesives and which one(s) I think are good (of course based on my experience); and I actually like the
MadameMadeline.com has the best selection of eyelashes and adhesives. I get most of my eyelashes from here or from Sally's Beauty Supply Store. Here is the link to MadameMadeline's eyelash adhesives/glues: CLICK HERE.
My favorites are: The Duo Eyelash Adhesive or the Eyelash and Eyebrow Adhesive Pen Wand. There is no noted brand for the latter, however you can get it for only $5.99 on MadameMadeline.com AND, it's clear or (looks like a transparent blue but dries to clear), and it's a tiny brush wand you simply brush on the band of your falsies, then apply. Less messy than dealing with the tube adhesives that usually come included with false eyelashes and it stays on ALL day, as oppose to peeling off hours later.
Ardell's Lash Grip Adhesive doesn't really stay on long for me, however if you DO happen to like it, they have their adhesive in BLACK, so it blends in with your eyeliner (assuming you wear black eyeliner), for a flawless look.
Tuesday, December 2, 2008
False Eyelash Recommendation & A Cyber Weirdo
Labels: False EyelashesThank to Ellie, Mimi, and for all you other ladies that have given me the heads up on crazies, but apparently some weirdo has setup a blog stealing other people's pictures including Temptalia, xSparkage, and mine, obviously without any permission. Not only did she take the time to edit each and every one of the pics and making fantastic collages, she has responded to the praise from unsuspecting people as if SHE did all that work! WOW is all I can say. I think there is some sort of chemical imbalance and insecurity issue with people who do this sorta thing. It's almost like they really try to convince themselves, lol.
Anyway here is her site, so no one else is FOOLED; feel free to give her your 2 cents: http://modern.bahlog.net
Many of you asked me about some of my false eyelash recommendations, so here is a list of some of my favorite falsies (no particular order), feel free to Google 'em for pics or more info:
Upper Lashes:
- Ardell Invisiband (Babies, Scanties, Luckies, Demi Wispies)
- Ardell Fashion Lashes (#134, which are thick doll like lashes), #117 and #102 Demi Lashes
- Ardell Runway Lashes in Claudia
- Ardell Elegant Eyes in Sophisticated
- NYX Eyelashes #101 and #117
- Andrea Mod Lash #62
For outer lashes ONLY (for a more natural look):
- Ardell Accents Lashes in #301
Lower Lashes:
- Sassi Eyelashes #33
Saturday, November 29, 2008
Tutorial: How to apply false eyelashes
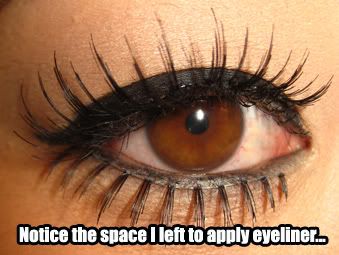
Labels: False Eyelashes, How to apply false eyelashes, TutorialsHere's a quick tutorial on how I apply false eyelashes. Measure the lashes first by holding it against your lashline, if it's too long for you, trim the ends so it fits; then apply lash glue across the band. I find it easier to use tweezers and look down, then apply the lashes across your lashline. You can lay the mirror flat or at an angle, depending on what works for you. Once you have applied your falsies, let the glue dry and re-apply eyeliner across the band to "hide it" for a flawless look. Then apply mascara like normal blending your natural eyelashes with your false eyelashes. I personally apply a little mascara before I apply falsies simply just to get it on areas that are hard to reach (rather than doing it while the falsies are on and risk disturbing it); and then I apply it after the falsies are on as well.
For lower lashes: I like to apply it also with tweezers, and leave a little space between the lash itself and your lower lashline so that you can fill it in with eyeliner later.


I forgot to take a pic after the eyeliner and mascara were applied, so I used an older pic where you can see how it helps blend the false eyelash with your natural lash. (For this original fotd post, CLICK HERE)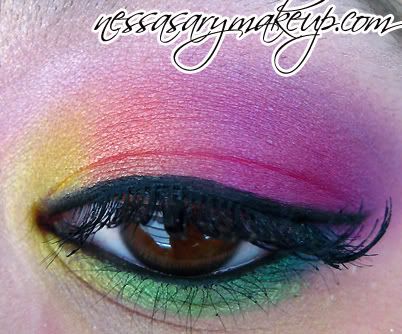
For lower falsies, you can shade a little bit of eyeliner to see where to place it, then apply your falsies and then fill the space with eyeliner....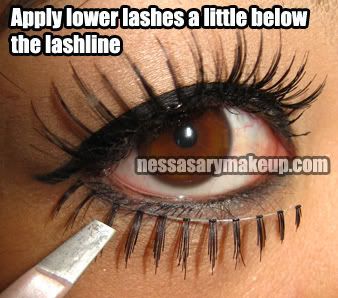
Wednesday, August 8, 2007
Reader Question
Labels: False Eyelashes, Reader QuestionsQ: You have really gorgeous full lashes! Do you ever wear falsies?
______________________________________________________________________________
A: Thanks! I DO wear false eyelashes on occasion, but I don't usually wear them because I wear them enough when I do photoshoots AND because I have long eyelashes as it is! But I like to be playful for special occasions so I will sometimes wear them for fun. It's bad to wear false eyelashes on a daily basis sorta thing because of the glue which can irritate the eyes and possibly cause an infection, so I just limit it to "special occasions".
Monday, August 6, 2007
Sunday, July 8, 2007
How to APPLY FALSE EYELASHES (Video)
Labels: False Eyelashes, VideosThey do it the right way!
Saturday, May 19, 2007
"Your eyes are the windows to your soul..."
Labels: Eye Makeup Photos, False Eyelashes, Mascara, NYX Cosmetics, SephoraI think the most show stopping part of the face is the eyes. It's what everyone looks at. When you have great shading and "eye-catching" eyeshadows (get it? haha), the more people have a tendency to look at your eyes. When I go out and someone compliments me on my eye makeup they want to know 2 things: What colors do I have on? And how did I do it?
Like I mentioned before, I MIX ALL my eyeshadows, not because you have to, that's just how I am. I love all sorts of colors and I love experimenting with the mixing of colors to achieve one really awesome color that just 'pops' on my lids. The trick is to really know how to blend and shade correctly and evenly. Trust me, it's not that easy.
And believe me, you DO NOT have to spend a lot on make-up to get the look you want. I know there are girls out there who live on MAC Cosmetics, and that's fine (because I love MAC myself), but $14.50/eyeshadow can be a bit steep for some. You can find (or make) similar colors to that of MAC at your local drugstore. I love NYX Cosmetics because they have tons of colors and their eyeshadows are only $2.99 a pop, so you can get a lot if you have $20; and that's how much ONE MAC eyeshadow is including tax and they work just the same!
I do what I call, an eyeshadow test, I place layers of different colors on my hand and BLEND them together to see how they compliment one another. Of course it's different on your hand than your eye, but you wanna see how they look overall blended.
Here are simple steps to applying eyeshadow:
1. It is very important to use an eye primer, or eyeshadow base because that holds your eyeshadow in place and prevents creasing. (see below, Laura Geller's Spackle Trio)
2. Use an overall highlighting eyeshadow to widen and brighten up the eye (try Revlon's Colorstay eyeshadow in "White Whisper", $6), apply this ALL over the lid all the way up to the brow bone.
3. Then apply the LIGHTEST color of eyeshadow on the inner corner of your eye. What I mean by lightest color, is when you are trying to achieve the "gradient effect" (see picture above), if you look closely, I actually have 3 different colors. You want, light, medium, and dark shades (in that order) on your lid.
4. Apple the MEDIUM shade from almost your inner corner of you eye, all the way to the end of the lid.
5. Take your darkest shade using an ANGLED eyeshadow brush and BLEND that shade with the medium until it looks almost one color from the outer to the inner part of the lid, but can still see the medium and dark shade separately.
For the pic above, I used Revlon's "White Whisper" as my highlighting base, Flirt Cosmetics "Limelight" as inner corner and medium shade, and an unknown brand black sparkly eyeshadow as my dark shade and blended it together. And voila!
I really like these 2 eyeshadows, they are both Sephora brand, I don't know the names of the colors, but it's a gold shimmer, sparkly color, the one that is open, is a CREAMY eyeshadow which I recommend to wear UNDER another eyeshadow if you plan on wearing eyeliner because it's super hard to put eyeliner on a cream eyeshadow as it is just gliding everywhere. (Sephora, $10)

Another thing I love, is this cream eyeliner palette from Sephora ($15), it's a 4-in-1, and has 4 different eyeliner colors to match a majority of outfits. Has silver, black, goldish-brown, and army green. It's also perfect for your purse or traveling.
Once you are done with eyeshadows and eyeliner, the next step is MASCARA. I love L'oreal's Telescopic Mascara ($6-9), it lengthens your eyelashes a lot so it looks like you ARE wearing fake eyelashes, or Sonia Kushuk's "Lashify Waterproof Mascara" ($7.99, see below), it even comes with a handy eyelash comb! To "lengthen" your eyelashes, first comb out all your eyelashes (I like Sonia Kushuk's eyelash comb/eyebrow comb combo), and then use a CLEAR mascara (gel-like almost), this is a great primer for eyelashes and helps your mascara glide on easily avoiding the annoying CLUMPS. Apply a couple coats of your mascara, and then from the very TOP of the eyelashes only, apply several coats, making your eyelashes look "longer".

And what completes the whole eye than a pair of false eyelashes to really widen your eye and get everyone talking about how beautiful your eyes are!
As you can see, I got these from Sally's Beauty Supply ($4 a pop). It's best to get them here because they have quite a selection from normal lashes, to runway, to high fashion, what ever look you are going for, you can find it at Sally's. Target and other drugstores have a very LIMITED selection of eyelashes simply because that's not a specialty store and only carry certain items.
Get the "invisibands" eyelashes because they have invisible bands so it looks flawless as if you are not wearing any fake eyelashes. Be sure that once you have applied your lashes, that you put black eyeliner along the band to finish the look!
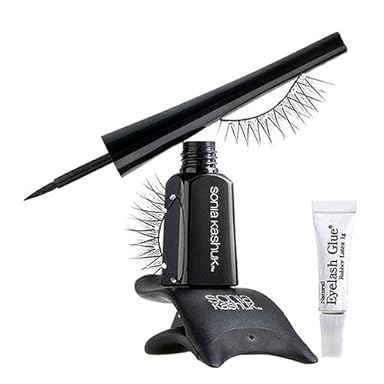
If you are new to putting on eyelashes, try Sonia Kushuk's "Leading Lady Eye Set", $12.99 at Target.