I've always loved MAC Pigments, how you can mix them and all the shades they come in; however I hate the outrageous price. I know that they give you a lot, but seriously you don't even need that much. My NYX loose eyeshadows are super tiny and those of you that have one know what I mean, yet I still have yet to come close to finishing a bottle!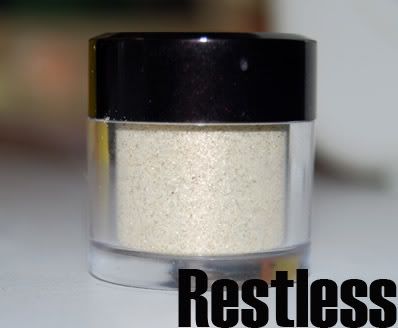
I recently bought L'Oreal's HIP Pigment in "Restless" and let me tell you, I am in love. I am convinced that a good majority of the high end cosmetics are very well imitated by their competitor- the drugstore brands.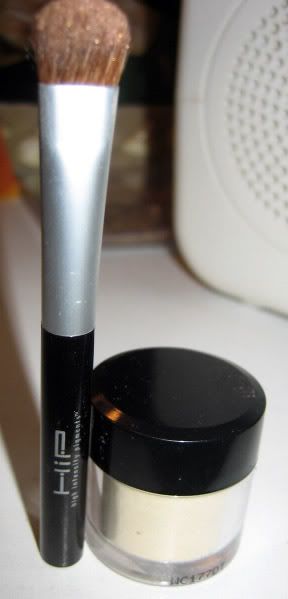
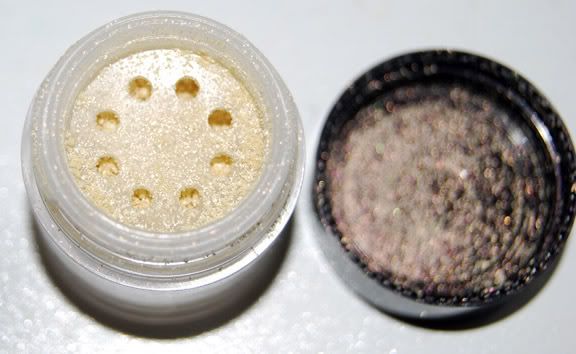
I was VERY impressed with these pigments because the color is shimmery and yet you can control the intensity of it, sheer or heavily pigmented. The best part was that it was only $10 at Target AND came with its own brush! The color I bought is a nice creamy, gold, almost like a pigmented version of MAC's eyeshadow in VEX, or Flirt's Limelight.
I am DEFINITELY going to buy more colors of this stuff because its awesome. I also bought Wet N' Wild's version of "pigments" in "White Lotus", and it's a white pigment with flecks of glitter, it's super pretty!
Here is the Wet N' Wild in "White Lotus":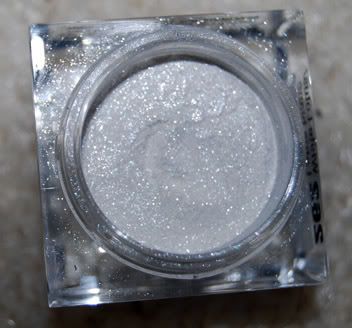
Swatch of it on my hand, pretty eh?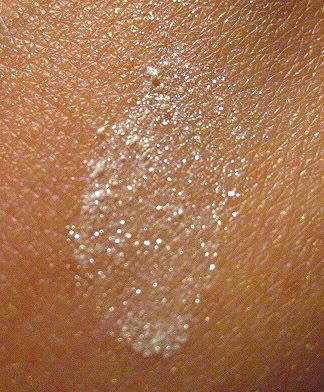
I also bought a double ended duo brush that has a round tip flat head on one end and an angled brush on the other, I don't need anymore brushes, but this one is my "travel brush":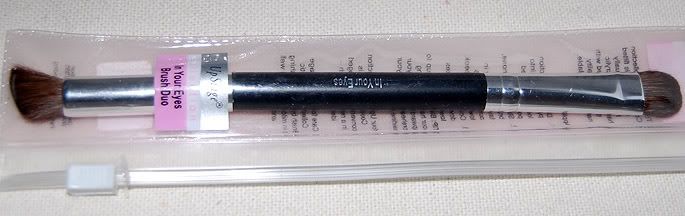
And my purse from OLD NAVY: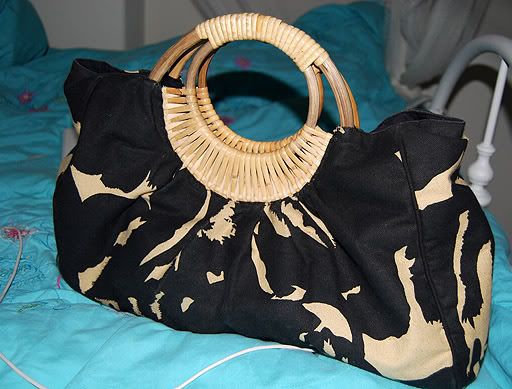
Tuesday, July 31, 2007
L'Oreal HIP Pigments Review
Labels: Beauty Picks, Fashion, Product ReviewsM.A.C. Painterly
Labels: MAC
Mac came out with their new line called "Painterly" and it looks awesome! It's supposedly a lot more bolder and smoother than the MAC Paints (which I already love). I am planning to pick up "Bare Study" and of course "Painterly".
Reader Question
Labels: Lips, Reader QuestionsQ: Hey Nessa,
I'm always having trouble finding a nice deep RED lipstick or lip color, any recommendations?
--Jhen
___________________________________________________________________________
A: If you have dark skin, Clinique's Lipstick in "Dark Honey" is a nice shade.
- MAC's Lipstick in "Ruby Woo" or "Russian Red".
- Dior Addict Ultra Gloss in Relish of Berries
- Dior Addict Plastic Gloss in Electrifying Red
- LORAC Lotsa Lip Plumping Lip Gloss in Naughty
- Urban Decay XXX Shine Lip Gloss in Guys Love Betsy
- Stila Lip Rouge in Pucker
- LORAC Sheer Wash in Sheer Emotion
- Urban Decay Lip Envy in Envious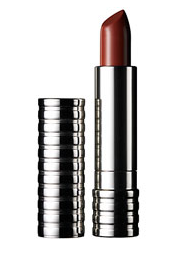
- Clinique Lipstick in "Angel Red".
- Covergirl Continuous Lipstick in "Classic Red"
For this pic, I used NYC Lipstick in "Firefly":

Monday, July 30, 2007
Reader Question (RE: Facial Contouring and Highlighting)
Labels: Eye Makeup Photos, Face, Reader QuestionsQ: Hey girl...can you tell me how to contour the nose exactly? Like how to make it slimmer...I know it's like casting a shadow on both sides of the nose then highlighting the bridge but how can you put it on without looking like you're doing it on purpose? I don't want to look like I smudged two stripes of bronzer on the sides of my nose then highlighter on the bridge. Can you tell me if it involves a lot of blending (like your eyeshdadows) and if you use a brush vs. triangle sponges and if that's the first or last thing you do once you're done making up the rest of your face, etc.
Thanks!
Bella
______________________________________________________________________________
A: Hi Bella! To answer your question, yes it does involve some blending, but it's a lot easier once you get a hang of it. If you happen to put TOO much bronzer and it's TOO dark, simply use a light foundation or loose powder and brush over it to lighten it so it's less obvious. You can also use a sponge to dab away any excess bronzer or to "lighten" the look and I actually do it LAST, so my foundation and blush is already done, the contouring of the nose is what I do last, but I think it's safe to do it either way (contour first and then foundation application), but it might cover up the bronzer and you'll end up probably applying more giving you a cakey look.
Here are some photos of the contouring [as well as a natural look], see how the natural highlight falls on my forehead and cheeks?:
BEFORE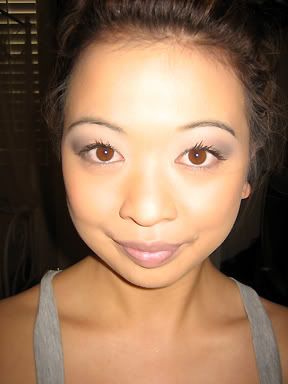
In this photo, look how wide my nose is....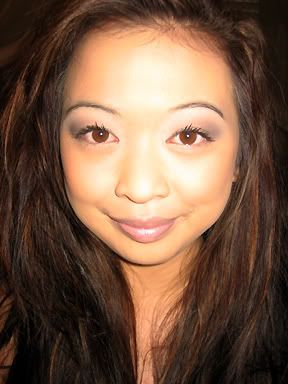
WITH A LITTLE CONTOURING...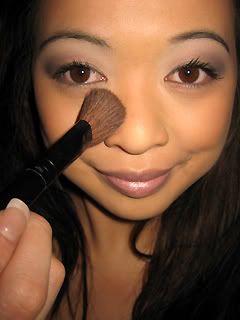
It's a lot narrower!
Reader Question
Labels: Reader QuestionsQ: It would be great if you could show us some of the looks you come up with when using your new items. Do you actually go out on a daily basis with dramatic looks?
__________________________________________________________________________________
A: I actually DO show looks with my new items (example: MAXFACTOR lipgloss in "Stood me up" was shown as a "recently bought item" and re-surfaced again (along with other items like MAC Paints, Flirt Cosmetics, etc) in some of my eye makeup photos. And NO, I do not go out on a daily basis with dramatic looks, I create these looks just to show variations of looks that people can do and try out on their own for whichever occasion they choose. I think it would be quite boring to show everyone the same look over and over again, as of course this IS a makeup blog, hence it covers EVERYTHING from the au natural, to fantasy, to smoky, to dramatic, etc.
Actually, my day-to-day makeup changes depending on the outfit I am wearing. YUP! Depending on the COLOR of my outfit, that is the color of my eyeshadow. So if I am wearing teal, then my eyeshadow is teal, if I am wearing beige, then I am sporting the beige/taupe look, it really just depends on my mood and what outfit I am wearing.
Facial Contouring and Highlighting
Labels: FaceI have had many people ask me to blog more about facial contouring and highlighting, so I made a "map" of where on the face you need to contour and to highlight.
[I WILL provide actual face pictures of these two soon, but settle for this for now, lol.]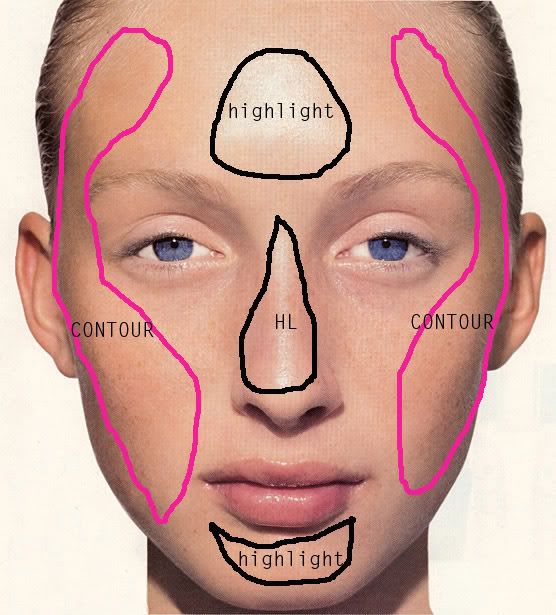
Areas shown in BLACK, are the areas you should highlight, and the areas in PINK, are where you should contour.
HOW TO DO IT:
The best way to find out whether you should go for contours, highlights, both - or give them a miss entirely -is to stand under a bright light - directly overhead, if possible. There should be some sort of shine on your face when you do this: ie, moisturizer, tinted moisturizer or foundation. When looking in the mirror, study how the light falls on your face.
If there is light shining over your cheekbones, for instance, this is an obvious place to apply highlighter. If there is a shadow under the cheekbones, this is where the contour product would go. Easy huh? You may find that you get neither if your face is rounder, and this is where you will have to use your judgment. Careful application can give you the illusion of these missing contours, but you don't have the easy guide to apply by. Sorry. Try sucking your cheeks in like a fish and look again. Sounds ridiculous, but it works.
CONTOURING:
I usually don't recommend this unless you are very confident with make-up because you can end up looking like you need a good wash!
If you are going to go ahead, you'll need a darker powder than the color of your skin. Pressed is far easier, and the number of shades you darken by should be in proportion to the skill of application. The darker it is compared to your own skin, the easier it is to make a mess!
I find that a dark pressed powder works much more easily than a bronzer or even a darker version of your chosen blusher, though that can work as long as you are only doing cheekbones. Here's how to add the contours...
- Apply foundation and powder as usual
- If you don't wear powder, you are going to need to do this with a foundation (sticks work really well for this) that is slightly darker than your skin instead
- Blend either the liquid or powder in the areas that you had shadow when you stood under the light
- If you are using it to slim the face, apply to the entire outer perimeter of the cheek. Usually this is only done from the sides to make the face look less wide. However, you could also minimize broad or high foreheads, jawlines and noses this way too. Simply shade in the areas that you want to be less prominent.
- If you go too far, don't panic; apply more of the neutral foundation or powder over the top before starting to add colour to dampen it down
- Always do this sort of shaping prior to color application.
HIGHLIGHTING:
If you want all-over sheen, apply your foundation as usual and follow with the shine product. Alternatively, you could mix the shimmer into your foundation, which is easier. Some excellent products for this are Prescriptives Magic, Lauder Spotlight, BeneFit High Beam and Lancôme MaquiSuperb. But if you are going for specific highlights, follow these steps:
- Apply foundation and/or powder as usual.
- Choose the shine product according to whether you wear powder. If you don't wear powder you will find that a powdery highlighter sticks to the moisture left behind by the foundation. Likewise if you applied a powder you may find a liquid or cream highlighter sticks to the powder and makes blending a nightmare. If you are really good with application you can get around these problems, but it is a good guide.
- Apply your highlight product to the places where the light stood out when you were under the light source. These are normally over cheekbones, over the brow bone, the bridge of the nose, over the mouth, and perhaps under the eyes. Be careful if you are going to have photos done: when the flash goes off, the light will bounce off the highlighter. If you have applied too much, the light will magnify it. And, particularly under the eye, you can look very surreal and strange. Think drag queen!
- If you are creative and don't want the shine but still want a sculpted look, you can do the highlighting with a foundation that is lighter than your skin. It looks lovely and is much more subtle. Again, this is a good use for a stick foundation.
Reader Question: Concealer/RE: Before and After Post
Labels: Concealers, Reader QuestionsQ: I think you are very bold in posting a before picture. I could never do that. Well at least without concealer for my undereye circles. Which concealer do you use? And how exactly should one apply it? I have Mac studiofix i think and i don't know if i'm applying it wrong but it always cakes up. when i tried smashbox, I got the same result.
_________________________________________________________________________________
A: Haha, well yes I AM "bold", but it's really not about being bold, I know many gals who are scared to put "natural, no-makeup" pics, especially online! But the truth is, we can't be insecure about ourselves, I know we are human and it's natural to FEEL insecure, heck I do at times; but makeup shouldn't be a MASK to hide ourselves from the world.
I mean we see celebrities that we idolize on magazines without makeup *OH NO!*, and people are quick to say "gosh she is ugly without makeup", but we say that because we are so used to them being made up [and they have the money to have a makeup artist and a hair stylist to make them look gorgeous], but ANYONE, and I MEAN ANYONE can look smoking hot with their hair and makeup done and it takes a lot of guts to show people what you look like without the "mask". But if it was opposite, a girl who we are used to seeing WITHOUT makeup, she is normal, but let's say she gets ready for her wedding day and gets her hair and makeup done, everyone is like "damn! she is hot! I never knew she was so pretty", it really just depends how people choose to perceive it.
Putting "before" pics of myself is me showing you people that I am human, I am an average girl you'd see walking down the street, and like many of you, I DO have flaws and imperfections, and makeup helps covering those up. As a past model, people think "oh she is beautiful", or "oh she is too ugly", and it's all makeup and photoshop people!
Example: This photo was taken by Brian for babestir.com [when it was a running site], Katie B did my makeup for the shoot [very talented and awesome gal], gorgeous work huh! And if you go to some of my older posts where I have little or no makeup, it's a HUGE difference! I DO NOT look like this in REAL-LIFE btw.....
And NO MAKE-UP or COLORED CONTACTS:
CRAZY HUH!?
The CONCEALER I use:
I use Physician's Formula Perfecting Duo, it's a cream palette that I apply with my fingers, the yellow is to hide dark circles, and the skin colored side covers the yellow.
I also use Revlon's Makeup Concealer Compact in "Nude Beige", I apply this when I am FINISHED with my eye makeup, and I apply it under my eye for a creamier finish and so it lasts all day.
Sunday, July 29, 2007
Finally used my overnight bag!
I finally used my overnight bag for the first time, I slept at the boyfriend's house since we had to wake up early to go pick up a TV for our new place.
It actually DID fit all my necessities for the weekend AND more! I was even able to add my toothbrush and toothpaste, my brushes, vaseline, and more junk.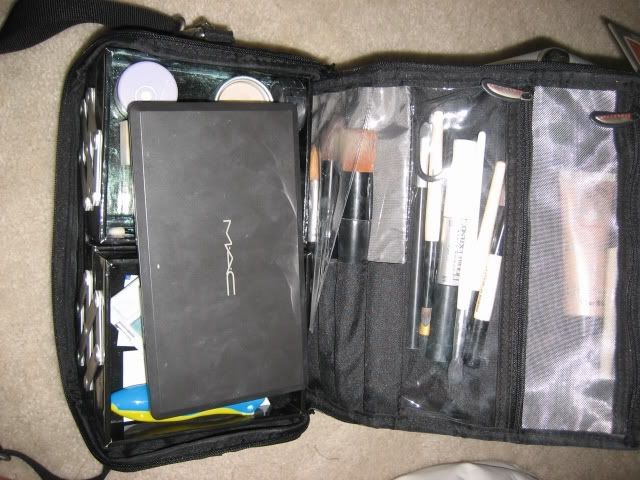
Before and After
Labels: Before and AfterMy inspiration: A book from Robert Jones, the "before and after" photos in this book are phenomenal!
My version, haha, amazing what makeup can do huh???!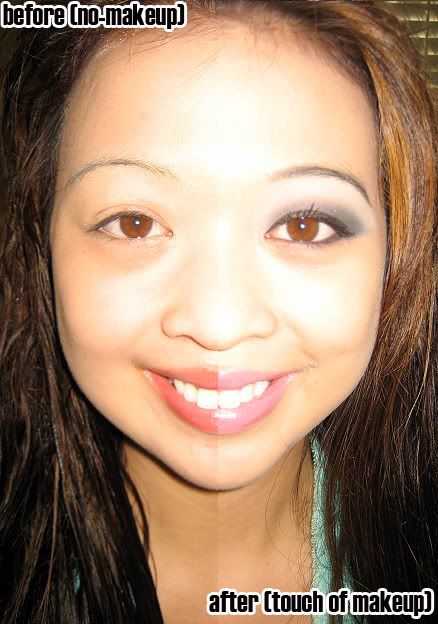
Reader Question (For teenagers)
Labels: Reader QuestionsQ: Hi! I am 15 years old approximately, what make- up should be appropriate for a.) school and b.) for an evening walk with my friends?
Thank you so, so much in advance!
______________________________________________________________________________
A: I suggest trying the natural look I posted a few weeks ago, especially since you are only 15 years old and have young, great skin, you don't need a lot of makeup, as you are at the age where acne and pimples can start. And for "age-apropriate" looks, the natural look [nude/neutral tones and very black mascara] is the way to go. To be honest, I didn't wear makeup until my first year in College, I wasn't even allowed to wear nailpolish in high school!
So I didn't "experiment" with makeup until I was 19. And perhaps that contributes to why I have been able to maintain great skin, because for a good duration of my teenage years, I wore nothing on my face but chapstick. I see TONS of teens at the mall wearing loads of black eyeliner, mascara, the works, and you can barely see their face! It just takes away from their natural beauty, remember makeup is to ENHANCE, not cover your face!
Some neutral eye shadows I recommend:
Reader Question (RE: Mineral Makeup)
Labels: Everyday Minerals, Reader QuestionsQ: There is so many out there! How do you know what to choose? I know they provide samples etc., but recommendations would be really nice. I am currently using BE but just read up on it and looked up what bismuth oxychloride is. I loved the product before but now I'm a little skeptical on it since I do get the itching when I am sweating or outside in the hot sun. I am a total sucker for great advertising though! and the convenience of getting it at my local mall (sephora). I belong to another blog and it seems everyone who is on there raves about everyday minerals but while they do have different formulations for their foundations, they don't have a great selection on their shadows and blushes. I love the idea of using all mineral products on my face since I am really sensitive to a lot of products out there. And I would really prefer to stick to one brand. Please help me out! Thanks.
__________________________________________________________________________________
A: Well it's hard for me to say which product I recommend for people to use because it all comes down to YOUR SKIN, and how much coverage you need, whether you have sensitive skin, etc.
I personally have somewhat sensitive skin, AND no pimples or scars on my face, so I don't need a lot of coverage when it comes to foundation, though sometimes I DO like the "airbrushed/matte" look and will apply a little more. The one thing about MINERAL MAKEUP, is that you ONLY need a little to cover your whole face. I liked Everyday Minerals because it's sheer coverage, it was hard to find my right shade, and even up to now, I think that the light olive and fairly light neutral im using is a bit off from what my real shade is, but still looks fine since its summer. Jenulence has a concealer/foundation formula in one for those who want to apply it wet OR dry, and for more coverage to hide and acne and/or scars, or just to have more coverage. Lumiere, well I couldn't really give them an accurate review as they give minuscule samples that weren't even enough to cover my nose! AND it was hard to find a shade. However I DO LOVE their flat top brush to apply my mineral makeup with! And I love the free shipping they have.
As for the convenience of getting mineral makeup at your local store, I agree, it's nice to be able to walk in a store, test and buy. But A LOT of mineral companies (well actually most) are simply ladies who create their makeup in their own settings and hence have an ONLINE business. Trust me, they know it's hard to gauge what shade you might be online which is why some sites offer SAMPLES so you can see which one is for you. Also, the best deals to me are online rather than in the store....ebay is a great place too.
A primer might help with your sensitive skin and you should use that BEFORE you apply your makeup.
I know that eyeshadows and blushes aren't the best colors on some sites, but I personally don't use any mineral eyeshadows and blushes, I use powder blushes and eyeshadows from other brands, and I think as much as we want to stick with just one brand out of convenience, it's inevitable and it's nice to play with different brands as they all bring something unique to the table.
Saturday, July 28, 2007
Lure Beauty
Labels: Mineral Makeup SitesAnother mineral makeup site I hear great reviews about, they have pretty much everything (jars, brushes, veils, finishing powders, eyes, lips, etc.) AND they have a 3 SAMPLE foundation pack so you can find your right shade for $6.75!
Check out their website: http://www.lurebeauty.com
Vanessa and CherryCulture.com
Labels: CherryCulture.comSo this morning I received an awesome email from CherryCulture.com:
Dear Vanessa
Thank you for featuring us at NecessaryMakeup blog site today.[they spelled "nessasary" wrong, well they spelled it right, haha but for me, since I am Nessa, it's NESSASARY, lol] We would like to invite you to our blogger program.
In this program, we offer the editor 2 free products each month. In return, we ask the editor to review and feature the 2 products at his/her site.
We also ask the right to use the articles at CherryCulture.com.
Let us know if you would like to participate in our program.
Advertising,
CherryCulture.com
How cool is that! Now I have more products for review! I can't wait to get started!
THANKS CHERRYCULTURE.COM!!!!!!!
Friday, July 27, 2007
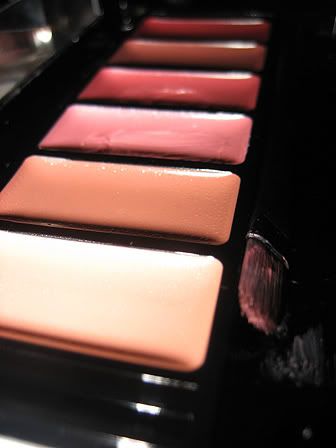
L.A. Girl Lipgloss Palette from CherryCulture.com
Labels: CherryCulture.com, Lips, NYX CosmeticsI finally got my lipgloss palette! I was disappointed that CherryCulture's Splash Eye Sparkle was out of stock. But they supposedly have a direct discounted boutique here in Los Angeles, so one of these days I am going to check it out.
REVIEW: I love the compact, some of the shades are OK, there are just MOST that I wouldn't wear, however I DO love the LIP BRUSH it came with, I can use that for my other lipsticks and glosses.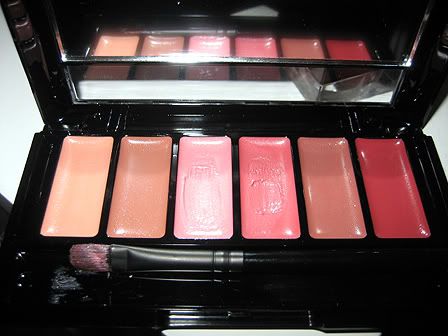
I also received my NYX Chrome eyeshadow in "Lagoon", to add to my ever-growing collection of NYX. Oh! Also for the reader that asked me about NYX (since she mentioned I can get it at CherryCulture), I only get items I cannot find at my NYX HotSpot (Longs Drugs)online, if CherryCulture offered FREE SHIPPING for all items (not having to spend $40 just to get the free shipping), then I would order from there all the time, but I am the kinda gal that likes to buy things right then and there and have it in my hands rather than track it and wait for it to arrive.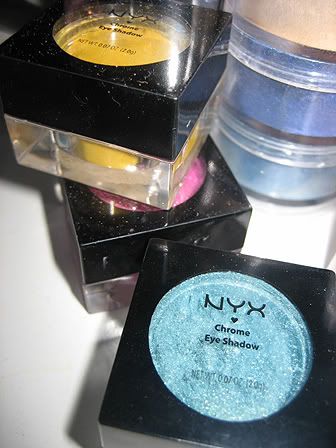
Thursday, July 26, 2007
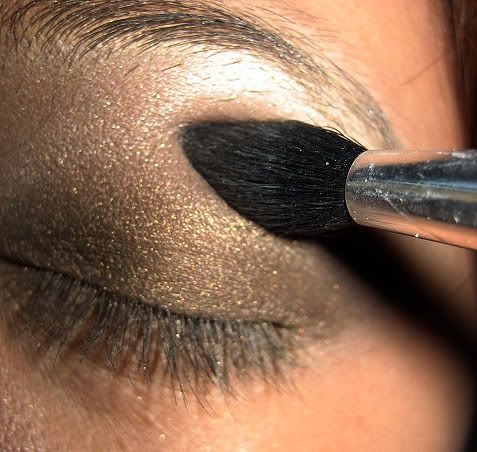
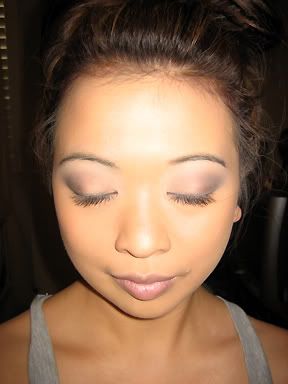
Eye Makeup Tutorial (Mermaid Look)
Labels: Eye Makeup Photos, Tutorials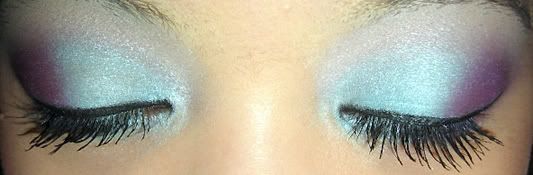
THE LOOK: Blue (L'oreal Canvas Teals) and Purple (Milani "Shock") together.
STEP 1: Put a little layer of Vaseline on your eyelid.
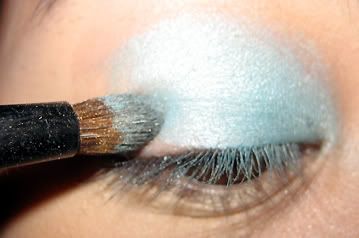
STEP 2: Apply your light blue eyeshadow [or whichever color you want] from the INNER corner of your eye to the middle of your lid, then STOP.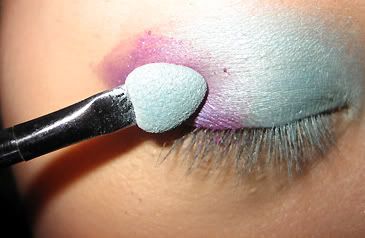
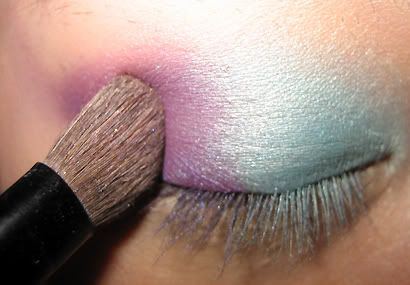
STEP 3: Using a SPONGE TIP applicator or a small brush that gives you ultimate control, apply the purple eyeshadow from the MIDDLE of the lid where the blue color ends, to the OUTER part of your lid.
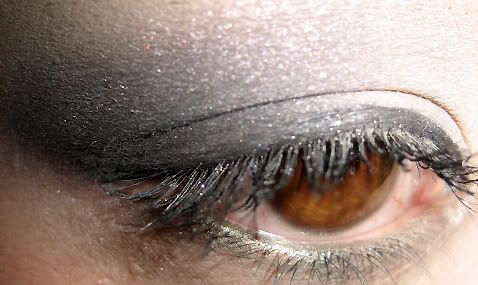
Which then gives you this look: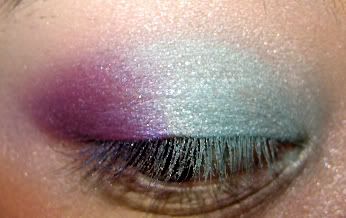
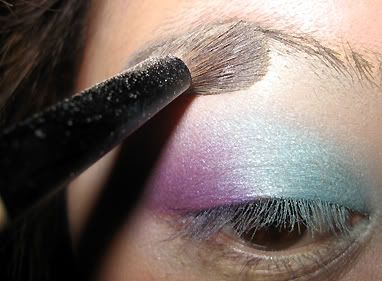
STEP 4: Then apply your HIGHLIGHT, OVER the two colors to your upper brow bone. Blend your ENTIRE LID softly with a blending brush to soften any harsh lines, and APPLY MORE of EACH color to the designated side of the lid.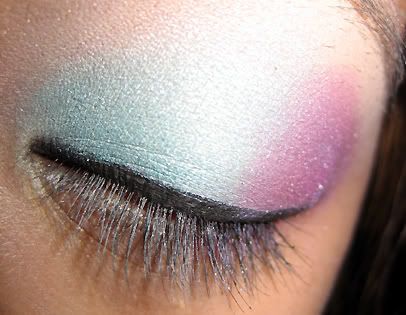
STEP 5: Apply your eyeliner. If you don't know HOW, check out my eyeliner tutorial in applying eyeliner. Then curl and add mascara (I used L'Oreal's Telescopic Mascara).
Then do the same on the other eye.
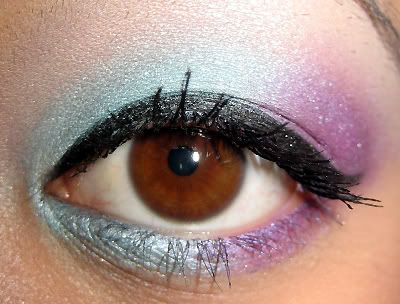
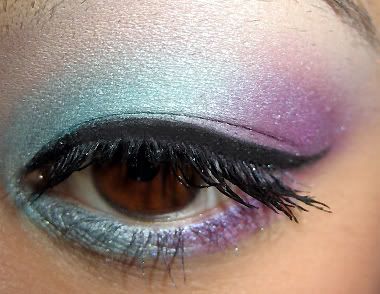
STEP 6: Then apply the same two colors on your LOWER lashes, you can put each color on the same side as the top like I did, or be playful and switch the sides so they are opposite [so the top outer corner has PURPLE, and the lower lash outer has BLUE]
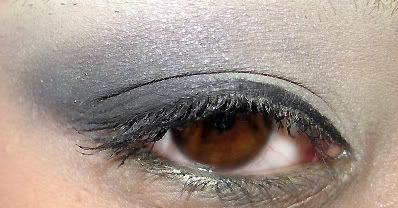
And VOILA!
Beauty Trick: Vaseline
Labels: Beauty Tricks, Primers and Makeup Bases
Good 'ol Vaseline, so why is this a beauty trick you ask? Well if you don't have or can't afford eye primer [since some brands ARE outrageously expensive], try using a thin layer of Vaseline as an eye primer. It 1.) Softens the delicate skin around your eye, 2.) It has a somewhat sticky texture which allows your eyshadow to sorta "stick" to it, so it stays on longer AND it seems to magnify the pigment of your eyeshadow (sorta like when you get your hair wet and it seems darker than it is when it's dry).
Vaseline also makes a great lip balm!
Wednesday, July 25, 2007
Eyeshadow Knockoffs
Labels: Beauty TricksI know that some of you can't afford to spend $15+ a pop for eyeshadow, so here are some "knockoff lookalikes" of the high end shades, I actually own MAC and some drugstore brands so I can actually vouch that they are almost identical!
Especially the MILANI eyeshadows!
Eye Shadow Knockoffs
# Bare Escentuals Cupcake Glimpse: Milani Illusion
# Bare Escentuals Queen Tiffany: Milani Java Bean
# Bare Escentuals Socialite glimmer: Milani Clover
# Benefit Lemon-aid: Jane Dream Cream
# Bobbi Brown Pale Pink: Clinique Pillowtalk Smudgesicle
# Cargo Nepal: Milani Flare
# Clinique Bronze Satin Shadow: Covergirl Tapestry Taupe
# Clinique Golden Lynx: Covergirl Glazed Ginger
# Clinique Silver Lining (pink): Jane It's A Girl, ULTA Love
# Clinique Strawberry Fudge (pink): Milani Illusion
# Dior GoldFusion: MAC Gorgeous Gold, L'oreal Enlightened Emerald
# Garden Botanika "Bronze" shadow: Jane Sungloss
# Lancome Un Taxi Mauve: Prestige UVA
# Lancome Riot: Jane Deeply Green
# Lancome Contrast: MAC Nocturnelle
# Lancome Golden Sun: Covergirl Burnished Gold
# Laura Mercier Cognac: Milani Spice
# Laura Mercier Whiskey: Prestige Sandalwood
# Lorac Serenity: NYX Sahara Ultrapearl
# L'Oreal HIP Saucy: Milani Sun Goddess/Milani Desert Sun, Prestige Melba, Milani Java Bean
# MAC Shadesticks: NYX Eyeshadow Wands
# MAC Amber Lights: Milani Sun Goddess, Milani Desert Sun, Prestige Melba, L'Oreal HIP Saucy
# MAC Aquadisiac: Jane Millionare
# MAC Atlas: ULTA Silk
# MAC Bamboo: Wild and Crazy Wild Guava
# MAC Banshee: Milani Spice
# MAC Beautiful Iris: ULTA Iris
# MAC Black Tied: Covergirl Shimmering Onyx, Milani Storm, Jane Clubbing
# MAC Blue Noir: Prestige in Ink
# MAC Brill: Wild & Crazy Bahama Water
# MAC Brule: Milani Almondine
# MAC Camel: Revlon Pro Bamboo
# MAC Coco: NYX Beanie
# MAC Cork: M Professinals Soft Brown Eyeshadow, Covergirl Swiss Chocolate
# MAC Cornflower: Physician's Formula Virtual Eyes Loose Shadow in Eye-Tech
# MAC Coquette: Almay Khaki Eye Gel
# MAC Creme de Violet: ULTA Iris
# MAC Crystal: L'Oreal Beauty Queen On-the-Loose
# MAC D'Bohemia: Wild and Crazy Crazy on You, ULTA Knit
# MAC Dazzleray Pigment: NYC Loose Sparkle Eye Dust in Champagne
# MAC Dark Soul pigment: Jane clubbing
# MAC Deep Truth: Loreal On the Loose in Night Fever
# MAC Dementhe: Milani Clover
# MAC Electra: Jane Hi Ho Silver
# MAC Electric Eel: Milani Atlantis
# MAC Embark: Jane Brownie Points, Flirt! Coconutty
# MAC Guacamole: Milani Limbo Lime
# MAC Goldmine: Prestige Golden Retriever
# MAC Gorgeous Gold: L'oreal's Enlightened Emerald Duo, Dior GoldFusion
# MAC Glare: Prestige Golden Sun, ULTA Silk
# MAC Hepcat: Prestige Blossom
# MAC Humid: Milani Clover, WnW Sensual Sage
# MAC Hypnotique: Prestige Saturn
# MAC Jest: Milani Peachy Peach, Maybelline Pink Sands, ULTA Bermuda Sand
# MAC Jewel Blue: Jane Eye Zing in Surfer Girl
# MAC Juxt: Prestige Wasabi, Milani Garden Mist, Jane Rain Forest, ULTA Mist, Jane Sage
# MAC Kicky Blue: L'Oreal Holographic Blue
# MAC Leisure Time: L'Oreal OTL in Flash Light
# MAC Little Madame: Milani Illusion
# MAC Lucky Green: Wild and Crazy Marquis
# MAC Medowland: L'Oreal Wear Infinite in Glistening Sea
# MAC Melody: Jane Millionare
# MAC Metamorph: Rimmel Hope
# MAC Midnight Blue: Jane Blue Jeans, Prestige Horizon
# MAC Mulch: Milani Java Bean, L'oreal HIP in Saucy
# MAC Naked Lunch: Wet n' Wild Fine Wink
# MAC Nocturnelle: Milani Shock, Lancome Contrast
# MAC Nylon: Milani Classic Beige, TooFaced Glamazon
# MAC Paradisco: Flirt! Feeling Hot
# MAC Parfait Amour: Milani Enchantment
# MAC Parrot: ULTA Deep Sea, L'oreal HIP in Showy
# MAC Perverted Pearl: Milani Silver Bullet
# MAC Pink Freeze: Prestige Ballet, Milani Taffy, Cover Girl Pink Chiffon
# MAC Pink Source: Milani Taffy
# MAC Pink Venus: Milani Taffy
# MAC Quarry: Prestige Sandalwood
# MAC Rose: Prestige in Flushed
# MAC Rose Pro: Jame Prom Queen
# MAC Sable: Milani Java Bean
# MAC Satin Taupe: Maybelline Silken Taupe, Rimmel Strength, ULTA Twilight
# MAC Shale: Milani Icy Plum
# MAC Shimmermoss: ULTA Luna
# MAC Silver: Milani in Mercury
# MAC Sketch: Milani Marooned
# MAC Shadowy Lady: Milani Marooned
# MAC Shroom: Jordana Beige, Jane Magic Mushroom, Wet 'n Wild Flirt Shimmer Stick
# MAC Soba: ULTA Toast
# MAC Sprout: Prestige Wasabi, Milani Garden Mist
# MAC Steamy: Milani Clover, ULTA Luna
# MAC Sumptuous Olive: Milani Antique Gold, ULTA Golden Olive
# MAC Sushi Flower: Prestige in Love
# MAC Swish: Prestige Love
# MAC Tilt: YSL Duo ???
# MAC Trax: Prestige Flushed, Flirt! Glamourazzi, Milani Desire
# MAC Unreally Blue: Milani Blue Jeans
# MAC Vanilla: Philosophy Serenity, Wild and Crazy Mist Over Me 3110, Milani Snow Frost
# MAC Vapor: Prestige Chilly
# MAC Vellum: M Professionals Opalescent White, Wild and Crazy Lily Song, Milani Moonlight, Max Factor Spotlight Sparkle
# MAC Vex: Max Factor Mint Matinee
# MAC Wedge: M Professionals Taupe
# MAC Woodwinked: Milani Golden Bronze
# NARS Ashes to Ashes: Maybelline Silken Taupe
# NARS Night Fairy: Prestige Uva, Hard Candy Star
# NARS Tibet: Ben Nye Pearl Shine eyeshadow
# Philosophy Prosperity: Urban Decay Floormat
# Shu ME 945: Caboodles Smooth
# Shu ME945: Majolica Majorca SV821
# Shu P Brown 76: Flirt Oh Please!
# Stila Barefoot Contessa: Prestige Spark, Jane Magic Mushroom
# Stila Go Lightly: Milani Golden Bronze
# Stila Grace: Ulta Plum Smoke
# Stila Heath: Prestige Sandalwood
# Stila Holly Golightly: Milani Golden Bronze, Jane Magical Mushroom
# Stila Jezebel: Garden Botanika "Mimosa"
# Stila Kitten: Wet n Wild Fine Wink, CoverGirl Champagne Eye Enhansers shadow, Sally Girl Silver Lining, ULTA Bermuda Sand
# Stila Pigalle: ULTA Chianti
# Stila Ray: Milani Sun Goddess, Milani Desert Sun, Prestige Melba
# Stila Sun: Prestige Champagne
# Stila Twig: Milani Spice
# Tarte Real McCoy: mark. minx
# Trucco C-Note: Milani Clover
# Too Faced Fantasy Island Duo (Blue): ULTA Luna
# ULTA Love: Jane It's A Girl
# Urban Decay Acid Rain: Prestige Wasabi, Milani Garden Mist
# Urban Decay Asphyxia: MAC Parfait Amour, Milani Enchantment
# Urban Decay Chains: Milani Antique Gold
# Urban Decay Face Case: Fira Face Case, Wet Seal Face Case
# Urban Decay Green Goddess: ULTA Mist
# Urban Decay Grifter: Prestige Uva
# Urban Decay Hotpants: Prestige Love
# Urban Decay Lounge: Physician's Formula Down To Earth
# Urban Decay Midnight Cowboy: Milani Sheer Sand, Sephora Old Rose; Cover Girl Bedazzled Biscotti
# Urban Decay Midnight Cowgirl: Prestige in Glisten
# Urban Decay Mildew: Prestige Iguana
# Urban Decay Oilslick: Covergirl Shimmering Onyx, Milani Storm, Jane Clubbing, Presige Ink
# Urban Decay Polyester Bride: Prestige in Glisten
# Urban Decay Roach: Max Factor Sable
# Urban Decay Roadstripe: Milani Moonlight
# Urban Decay Rust: Prestige in Melba
# Urban Decay Shattered: Naturistics in Azure
# Urban Decay X: Ulta Sunlight, Ulta Sunburst, MAC in Jest
Inquiries
Labels: Reader QuestionsREMINDER: I appreciate all your feedback and questions, and I am more than happy to help you all out and answer each question, BUT PLEASE include an email that I can personally reply back to as some question's don't really need to be posted and just need a simple reply back, so INCLUDE your emails please!
Thanks!
Q: Hey Nessa, I was browsing through your old blogs and I saw the picture of your vanity. I've been trying to find one, but none have come close to what you have. Where did you get yours!? Something like that would be perfect. Please let me know.
Thanks
_______________________________________________________________________________
A: Hi Marie, I actually got my vanity shipped from Washington state (my parents live there) and they moved last year so my mom had some furniture places she got her new furniture at and paid about $400 total, it was really like $299 but to ship a big item like that cost extra! Here is a link to some vanity sets:
CLICK HERE
Reader Question (RE: Sun-kissed)
Labels: Reader QuestionsQ: How did you do the eye makeup for the first picture? It looks gorgeous!! [previous blog]
__________________________________________________________________________________
A: It is the same makeup/steps in my "Sunkissed Look" Blog.
Tuesday, July 24, 2007
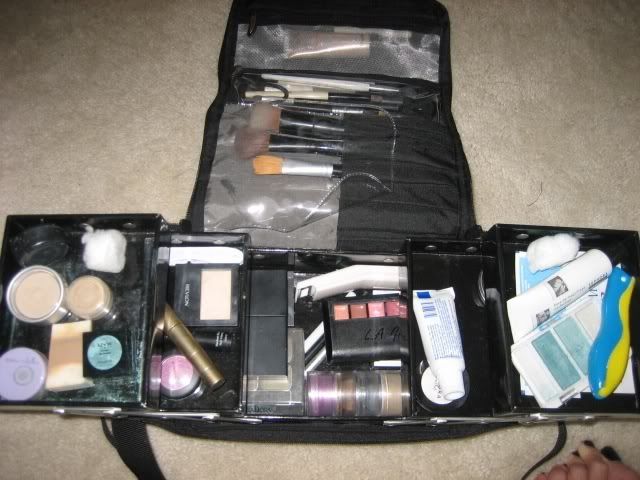
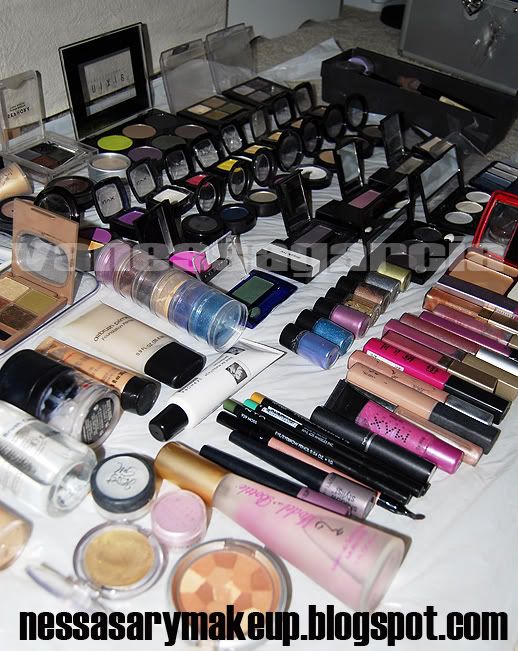
Entire Makeup Collection
Labels: Eye Makeup Photos, My Makeup CollectionI have been asked by people about my ENTIRE makeup collection, pictured are a majority of the makeup I have, there were some other eyeshadows and stuff that I couldn't fit into the picture, but for the most part, id say this is my entire collection!
Also, to check out my work as a photographer, click on this link: http://www.flickr.com/photos/nessasaryphotography/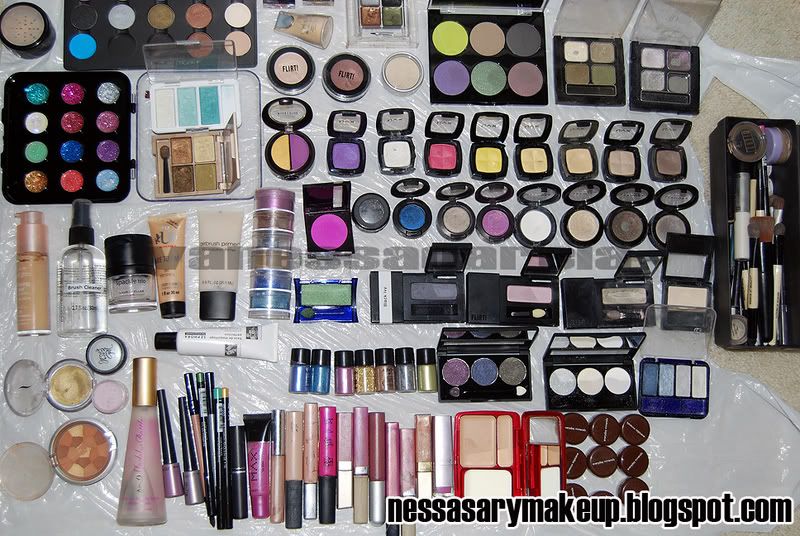
My lipglosses [not pictured are the lipgloss palettes, one from Color Workshop and the other from LA Girl]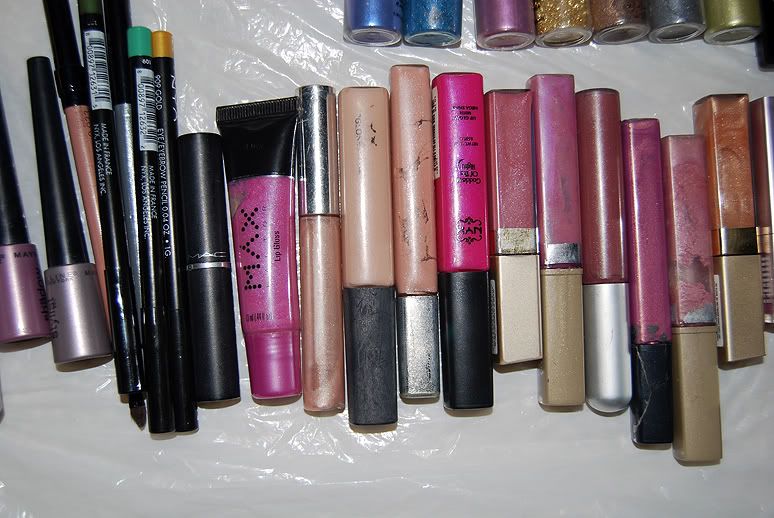
Sideview: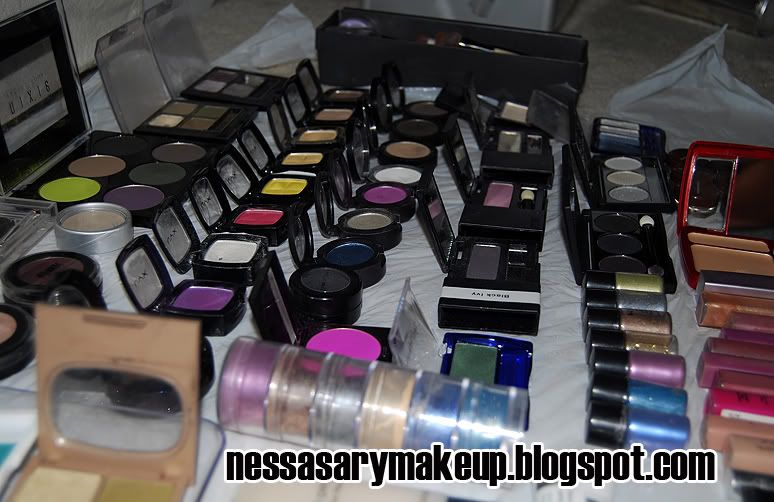
More blending/gradient pics:
Blending brush used to soften any harsh lines..