
I have had many people ask me to blog more about facial contouring and highlighting, so I made a "map" of where on the face you need to contour and to highlight.
[I WILL provide actual face pictures of these two soon, but settle for this for now, lol.]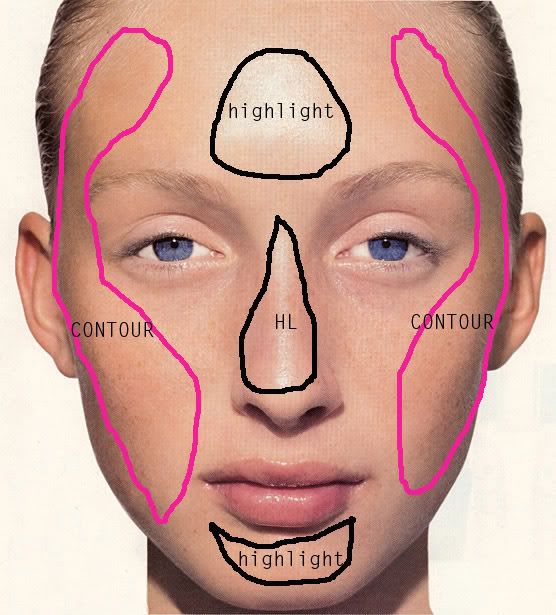
Areas shown in BLACK, are the areas you should highlight, and the areas in PINK, are where you should contour.
HOW TO DO IT:
The best way to find out whether you should go for contours, highlights, both - or give them a miss entirely -is to stand under a bright light - directly overhead, if possible. There should be some sort of shine on your face when you do this: ie, moisturizer, tinted moisturizer or foundation. When looking in the mirror, study how the light falls on your face.
If there is light shining over your cheekbones, for instance, this is an obvious place to apply highlighter. If there is a shadow under the cheekbones, this is where the contour product would go. Easy huh? You may find that you get neither if your face is rounder, and this is where you will have to use your judgment. Careful application can give you the illusion of these missing contours, but you don't have the easy guide to apply by. Sorry. Try sucking your cheeks in like a fish and look again. Sounds ridiculous, but it works.
CONTOURING:
I usually don't recommend this unless you are very confident with make-up because you can end up looking like you need a good wash!
If you are going to go ahead, you'll need a darker powder than the color of your skin. Pressed is far easier, and the number of shades you darken by should be in proportion to the skill of application. The darker it is compared to your own skin, the easier it is to make a mess!
I find that a dark pressed powder works much more easily than a bronzer or even a darker version of your chosen blusher, though that can work as long as you are only doing cheekbones. Here's how to add the contours...
- Apply foundation and powder as usual
- If you don't wear powder, you are going to need to do this with a foundation (sticks work really well for this) that is slightly darker than your skin instead
- Blend either the liquid or powder in the areas that you had shadow when you stood under the light
- If you are using it to slim the face, apply to the entire outer perimeter of the cheek. Usually this is only done from the sides to make the face look less wide. However, you could also minimize broad or high foreheads, jawlines and noses this way too. Simply shade in the areas that you want to be less prominent.
- If you go too far, don't panic; apply more of the neutral foundation or powder over the top before starting to add colour to dampen it down
- Always do this sort of shaping prior to color application.
HIGHLIGHTING:
If you want all-over sheen, apply your foundation as usual and follow with the shine product. Alternatively, you could mix the shimmer into your foundation, which is easier. Some excellent products for this are Prescriptives Magic, Lauder Spotlight, BeneFit High Beam and Lancôme MaquiSuperb. But if you are going for specific highlights, follow these steps:
- Apply foundation and/or powder as usual.
- Choose the shine product according to whether you wear powder. If you don't wear powder you will find that a powdery highlighter sticks to the moisture left behind by the foundation. Likewise if you applied a powder you may find a liquid or cream highlighter sticks to the powder and makes blending a nightmare. If you are really good with application you can get around these problems, but it is a good guide.
- Apply your highlight product to the places where the light stood out when you were under the light source. These are normally over cheekbones, over the brow bone, the bridge of the nose, over the mouth, and perhaps under the eyes. Be careful if you are going to have photos done: when the flash goes off, the light will bounce off the highlighter. If you have applied too much, the light will magnify it. And, particularly under the eye, you can look very surreal and strange. Think drag queen!
- If you are creative and don't want the shine but still want a sculpted look, you can do the highlighting with a foundation that is lighter than your skin. It looks lovely and is much more subtle. Again, this is a good use for a stick foundation.
Monday, July 30, 2007
Facial Contouring and Highlighting
.
Subscribe to:
Post Comments (Atom)


1 comment
Hey girl...can you tell me how to contour the nose exactly? Like how to make it slimmer...I know it's like casting a shadow on both sides of the nose then highlighting the bridge but how can you put it on without looking like you're doing it on purpose? I don't want to look like I smudged two stripes of bronzer on the sides of my nose then highlighter on the bridge. Can you tell me if it involves a lot of blending (like your eyeshdadows) and if you use a brush vs. triangle sponges and if that's the first or last thing you do once you're done making up the rest of your face, etc.
Thanks!
Here's my email: bella23000@yahoo.com
Post a Comment
Thanks for stopping by my blog!