
I recently acquired another search engine at work to help build and manage (once all the little things are fixed and everything is set in stone I will let you know what site it is!) So because it takes up most of my time, I probably won't be updating as much, BUT I will be trying to do all my posts at once then just publish them each day, but no guarantees! LOL. This new project at work takes awhile getting used to because it's literally like I am working for 2 different companies, but it's under one roof, so it's a bit manic!
Anyway, there are TONS, and I mean TONS of tutorials on pigment pressing, especially on YouTube! But I thought id do one anyway for those who are new to it, if you are still unsure how to correctly do it, please do watch Enkore's video on pressing pigments on YouTube, he's the pro! ***This is just how I did it, but there are MANY ways of doing it, so just find what's easier for you. This was my first time ever pressing pigments because I am pretty lazy when it comes to doing extra work so I usually just use the loose pigments as is, but I pressed a few for traveling! :)
I recently got my EZ Press Pressing Medium from Coastal Scents but I received it AFTER I did this tutorial, so I will do another one using this medium to see if there is any noticeable difference between this and just regular rubbing alcohol.
Why press pigments? Because they are less messy and they are easier to travel with rather than carrying loose pigments around that can make a big mess in your bag!
Is it the same color and pigmentation after a pigment has been pressed? I included swatches of the pressed pigments in this tutorial, to me they were just the same loose as they are pressed!
What you need:
- Empty pans (I used 26mm pans from Coastal Scents, they also have an empty palette with the empty pans)
- Or you can use a quad like the ELF quad
- Rubbing Alcohol (they say 90-91% alcohol, but I used about 71%)
- A medicine dropper or a dropper bottle to put the alcohol in
- Pigments
- Scooper and a spatula (can find it at a craft store)
- Empty Jar or Bowl for mixing pigment and alcohol
- Paper Towel or Cloth
- A quarter
- Blow Dryer (optional)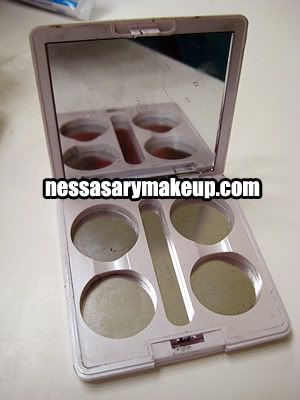


![]()
I used the smallest mixing bowl from the set I got from Everyday Minerals


I blow dry the pigment for a few seconds to speed up the drying process, but you can let it air dry overnight or for a few hours before pressing it with a quarter.

You can use a jar like this to mix it in also (left):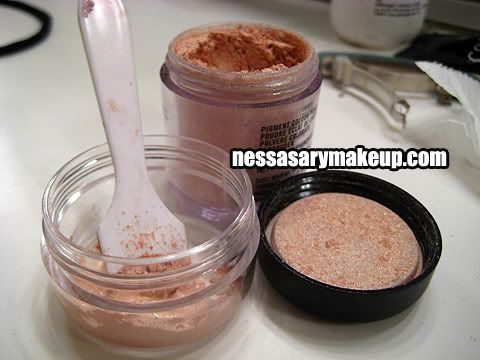

Here I just used another color, "Golden Lemon" Pigment:
Place it in the center of the pan because the product settles out, this prevents it from over-flowing in the pan:


"Sweet Sienna" and "Night Light" have blue dye undertones, so when pressed, the blue dye lifts onto the paper towel:

Pigment pressing palette almost done:
Swatches (dry, from L to R: Your Ladyship, Night Light, Grape, Kelly Green, Sweet Sienna, and Golden Lemon):
I get messy!
Friday, September 5, 2008
Tutorial: Pressing Pigments
.
Subscribe to:
Post Comments (Atom)


31 comments
great tutorial! I think the MAC pigments hold up with the alcohol better than the mineral shadows - I pressed a bunch of pure luxe shadows with alcohol and they flaked/had a lot of fallout once they were pressed and dried, but the CS pressing medium works really well on the mineral eyeshadows :)
i've never pressed pigments before. I hate ordering stuff online sometimes..
i just want it now. ha maybe i'll order the coastal scents pallet and do some pressing.
thanks for the tutorial!
LOL that is super messy! hahahah but I am so intrigued and you got me interested to press too!!!!
messy, but looks fun!
lol it looks like fun but so much work! haha maybe one day i'll press pigments!
look at that mess! i said i was going to press pigments last night, but i ended up doing something else. LOL, maybe tonight!
i see a fun (older) kid project in the near future! gotta start 'em young ;)
What a mess! LOL. Thanks for the tutorial anyway :)
thanks so much for this. I think my favorite part was seeing your hands...I got all messed up and I was sure it was just me and my clumsiness. Enkore didn't get messy at all!!! So, I'm glad that at least it's "normal" to get messy...
I also agree with the comment that mac presses best, I tried to press a bare minerals one and its still flaking out.
Also, my MUA told me that you can just press into the palette and not use a tin. It worked pretty well!
I agree with Mayaari--pressing with alcohol does NOT work with mineral pigments, mostly b/c there are no binding ingredients to help the wet pigments stick. I tried pressing my TSS e/s for a flight, and they just fell apart (plus the color changed a little)
But thank you for the tut! Good to know it'll work on my MAC pigment samples! XD
Funny timing on this - guess what I was trying yesterday? Alchohol will make your mineral shadows too hard, and they break easily. I've also read that they don't transfer to your brush and your eye very well after a week or so. For me, it's not an option because they'd all crack and break during shipping! I read that jojoba oil also is a good pressing medium - that's what I tried yesterday. I'm still waiting for it to dry! Not to mention how sore my thumb was by the end of the experiment from pressing so hard. But then again, I was pressing into deeper wells, which means far more powder and far more pressure. I spent an hour in Lowe's yesterday looking for something to use as a press instead of a quarter and a thumb. The guy walks up to me, asks if he can help me, and I'm like, "umm... no. I'm looking for things that are not for their intended use. Do you have any C-clamps that have bigger round thingies?" He thought I was nuts.
That hidden dye is really interesting! Did it change the color when you applied the pressed versions since you took away the blue?
those look so pretty 'nessa. i have no patience tho... shit, i only have like 3 piggies. lol
thanks for this tut! xo!
Thanks for that wonderful tutorial! I'll definitely pick up some e.l.f. quads once I get the chance. I guess I could try pressing some of my MAC and NYX pigs. Bummer that it doesn't work for mineral pigments too well :(
we should've had like a e/s pressing party when you did this. I was busy working on mine as well. I only got 5 done though LOL.
Robyn, you could use a quarter AND a regular vice/clamp, if it has a smaller surface area than the coin.
I think a British coin close to pan size would be a 10p piece...
Personally, I much prefer loose powders for applying eyeshadow, but I might try pressing some just to make a palette of complementary colours that I use most often.
Wow I never knew you could do that! thanks :) x
Woah lots of work! Just 9 more pans to go... haha.
I have the same question as Robyn - does the alcohol affect the pressed pigment colour since some of 'hidden dye' has been removed?
I love your blog! i hope you don't mind me adding u to my blogroll!
I've attempted pressing once before and ended up dropping my whole pigment shadow...This goes to show how clumsy I am. But seeing your post, it just made me wanna give it another try. Thank you for always being very details with your instruction. Even though there are many similar tutorials out there...I always ended up looking back at your because it's so detail and easy to follow.
pretty cool... never knew u can use pigments n make other shadows!! im goin to try this someday =P great tutorial! and messsyy messsy!! lol
Good idea, Anastasia! Now what kind of coin/something else measures 35mm?
Connie - stay tuned. I'm working on something new; you won't have to press your minerals. I've got 'Nessa road testing them out for me, but you just might see something quite cool in the next couple of weeks.
i didn't know we can do this! hahaha! i love messy! i wanna try this! :) thanks so much for doing this for us! :)
wow lol i just thought u'd press it on its own, lol thats what i did when my studio fix broke. but this is so smart for pigments.
thanks a lot for the tutorial, at least now I can keep this as a reference for the future
I love you! I was looking for empty pans to fit my Nixie Palettes last night so I can press pigments and blam! you post a tutorial on how to do it. You rock!
I got EZ Prez recently too. I used it to press a sample pigment that CS sent. It turned out great, really pretty and smooth. I can't wait to try it when I get more mineral eyeshadows.
I must add that the bottle it comes in sucks. I'd advise using a separate dropper when pressing pigments.
great directions of images nessa! (:
I wish I was talented enough to press pigments. I've tried numerous times, and failed every time.
I'll never be the photographer that Nessa is, but I came up with another (less painful) idea for pressing shadows. I can't add pics in the comments section, so I just did a whole new post on my blog linking back to this one. Check it out and let me know what you think!
Shopaholic Stuff: Pressing Mineral Eye Shadows
would this work on broken shadows? I have a few Shadows that are fairly new and broken into a million little pieces?
would "pressing" them like this bright them back to life??
Post a Comment
Thanks for stopping by my blog!