
Q: hi nessa! once again i am shocked with all the information you give to your readers! =] but when it comes to chosing the essential beauty tools, can you please explain to us whats what and how it works. for example i know that theres more than one brush for putting on eyeshadow, such as the smudge, and blending. =] thank you!
p.s. can you give out tutorials for highlighting..contouring the face? thank you! youre the greatest!
<3 jen
__________________________________________________________________________________
A: I know that there are tons and tons of brushes on the market, that for some of you it's hard to tell which ones you need, to use, etc. I personally have tons of brushes that over the years I have "collected", I never bought them all in one day sorta thing, and some I have duplicates of.
I personally think it's essential to have the following: (1) Large eyeshadow brush (for highlighting the entire lid), (1) Small or Medium angled-brush for more direct application of eyeshadows (great for the gradient affect), (1) Blending Brush (to blend in any harsh lines), (1) Kabuki Brush/Fan Brush to sweep away any fallen eyeshadow on your cheeks and for better control when applying lose powder, (1) Smudge Brush for lower lash lines (essential for the smoky eyes look), (1) Small-Medium regular eyeshadow brush, Sponge-tip applicators, (1) Flat top brush (if you use mineral makeup), (1) square tip flat eyeliner brush for gel or pot eyeliners, (1) Lip Brush, and (1) Blush Brush
I am going to use www.eyeslipsface.com's pictures they have for their brushes to better illustrate each brush and its purpose:
FOUNDATION BRUSH: I love foundation brushes because it allows me to apply and blend my luminizer and foundation without getting all dirty and allowing me to reach hard spots like the sides of the nose near the eye, etc. Most foundation brushes are made out of Nylon, I don't think it's a necessary brush because you can easily use a wedge sponge to achieve application of foundation.
CONCEALER BRUSH: It obviously to conceal and spots or areas of the face you wish to hide, great for applying concealer to dark under eye circles, or pimples.
EYELINER BRUSH: The square tip on an eyeliner brush is perfect for getting above and below the lashline to apply eyeliner (like MAC's Fluidline). It also allows you to create a thin or dramatic line.
EYESHADOW BRUSH/ALSO ANOTHER SMUDGE BRUSH: This particular brush [pictured] is another smudge brush, as you can see it's bristles are shorter than the average eyeshadow brush giving you better control when applying eyeshadow to the lower lashline or smudging for the smoky look. It's short bristles also allow you to apply your eyeshadow with great precision.
SMUDGE BRUSH (SPONGE): Most smudge brushes like this one are made of sponge-like material, very soft allowing you to create a sultry smoky look by smudging the lower lashes. It's awesome because it gives you a softer look without the harsh lines of eyeliner on your lower lashes.
EXAMPLE: 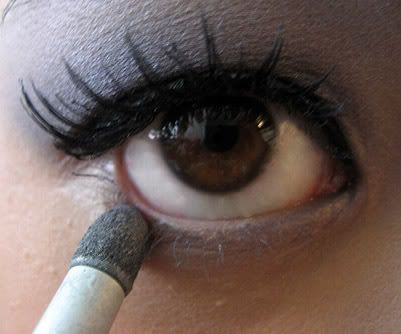

BLENDING BRUSH (MY FAVORITE): This has to be my favorite brush, and I can't live without it! The blending brush takes away all the harsh lines when you attempt to mix colors or achieve the gradient effect. As you can see below, two colors were used that are completely different shades of each other, you have a cream, then a smoky charcoal/black eyeshadow; when you apply it off the bat, it looks weird because they are opposite colors, but with a blending brush you are BLENDING the colors INTO one another so it goes from light to medium to dark.
EXAMPLE #1: 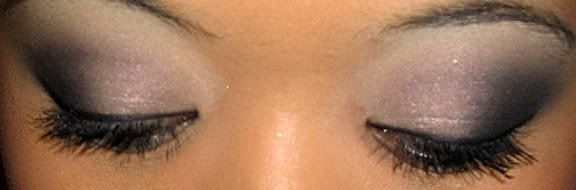
EXAMPLE #2: 

ANGLED EYESHADOW BRUSH: If you look closely to your eyelid, you'll see it's at an angle, as your eyeball is protruding with your eyelid, and the angled brush allows you to get more precision when you apply eyeshadow to the outer corner of your lid. It's perfect for creating a darker color on the outer lid, with a soft outer line.
LIP BRUSH: Lip brushes are awesome because they actually allow the color to "stain" and set in your lips a little more as oppose to applying it straight from a lipstick tube. The brush bristles get into every groove of your lip and holds onto color from lipsticks and lip glosses. **TIP** Apply chapstick, line your lips with your lipliner, apply your lipstick or lipgloss using your lip brush, then use loose face powder and gently pat it on your lips over the lipstick or gloss, and then re-apply your gloss or lipstick, this allows your color to last longer.

BLUSH/BRONZING BRUSH: Blush Brushes are designed with a little angle and fluff to get enough color on the apples of your cheeks. Start from the apples of your cheeks (to discover your apples, smile and you'll see it), then gently work all the way up to your ear. As a bronze brush, it's great for applying a powdered bronzer for a summer glow.
FACE BRUSH: Great for brushing away fallen eyeshadow on your cheeks as well as applying loose powder or setting powder. 
EYEBROW/EYELASH BRUSH WAND: I own this brush from Sonia Kushuk, it's great for getting rid of mascara clumps, as well as brushing stray eyebrow hairs into place.
KABUKI BRUSH: This cute little thing has a short handle giving you better control for hard to reach places and brushing away eyeshadow and applying powder.
FAN BRUSH: Also perfect for taking away any fallen eyeshadow and brushing away any powder or excess makeup.
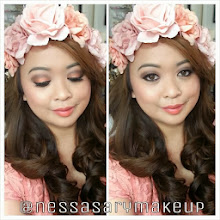
For highlighting and contouring the face:
Sweep a highlighting or luminizer on areas you want to be highlighted (cheeks, nose, forehead), if you have a round face, you can make it look narrow by adding blush and adding a darker powder on your jawline. In this pic, the makeup artist "shaded or shadowed" the sides of my nose by the bridge to elongate and narrow my nose, hence it probably doesn't look like me!
Tuesday, July 24, 2007
Brush Types
.
Subscribe to:
Post Comments (Atom)


5 comments
wow! thank you!
Hi Vanessa,
I just read your blog about the brush types, can you show a picture of what a "medium angled brush" looks like since you said it works great for a gradient effect. For the life of me, I can't figure out how to do that. I apologize now if I'm asking for too much but can you type out how exactly to do the gradient thing? Do you put the lighter color first and THEN the darker color in the corners? And when you say you have to blend really well so that the two colors are (duh!) blended well and there are no lines, wouldn't the colors get all mixed up? I mean like wouldn't you end up looking like a raccoon or have the two colors all over the place? Where exactly do you blend? Right the middle of the two different shadows? And do you move in a sweeping motion from left to right or in swirly circles right in the middle?
Sorry!
If you can, can you email me a response to my email: bella23000@yahoo.com
Thanks in advance! :)
whoa, that's pretty cool about the shadowing of the nose thing. :] it would ROCK if you did a tutorial of that. hehe. :]
I love your makeup in this picture. I really like the blue eyeliner on your bottom lashes. I also like how the makeup artist "shaded" your bridge. Any idea how she did that and what she used. I also like your tip on narrowing your face, since I do have a small, but round face. Do you think you maybe be able to go into more detail as to how exactly to do that? Thanks!
OH MY GOD!!!!YOU ARE SO PRETTY!!!!!!!EEEEEE!!!!
Post a Comment
Thanks for stopping by my blog!